So you’ve finally treated yourself to a top-of-the-line Philips 4K TV, but you also want to ensure you’re getting the most out of your purchase. Without proper knowledge of how to optimise your TV’s settings, you may not be able to enjoy its impressive features.
A new television is a significant investment and will likely serve you years of entertainment, so you must maximise its potential. Although tinkering with picture settings may seem daunting, a few simple tweaks can make a massive difference in the quality of your viewing experience.
Ideally, it’s best to set up your Philips 4K TV properly during the initial installation process to avoid any positioning issues that may arise later. However, it’s never too late to make further adjustments to your TV’s picture settings, which can significantly enhance your viewing experience compared to the factory settings.
In fact, you can customise the settings according to the content you’re watching or even adjust them based on external factors such as weather conditions. For example, if the sunlight’s coming through the window, you may need to increase the brightness to compensate for the glare.
Our comprehensive guide will walk you through the process of adjusting the options to achieve the best picture settings for Philips 4K TV, including brightness, contrast, motion processing, and more.
Positioning Your Philips 4K TV
One of the most straightforward ways to ensure optimal viewing quality of your Philips 4K TV is by correctly positioning it in your room rather than simply placing it next to the nearest wall outlet. To begin, put the TV in a manner that allows as many seating positions as possible to view it straight-on.
When viewed from an angle, the colours and black levels of the picture can appear dull and greyed out, especially with LCD TVs. OLED TVs handle this issue better, but we’d still suggest viewing the TV straight-on to experience the full vibrancy. If your room’s size or shape makes it challenging to position your TV optimally, a pivoting TV stand/wall mount is worth considering.
Reflections are another variable to consider when positioning your Philips 4K TV. Most windows have blinds or curtains you can close. Or you can switch off any lights that may cause unwanted glare.
However, it’s worth noting that watching TV in a completely dark room for extended periods can cause eye strain. You must find balance between reducing reflections and maintaining a comfortable viewing environment.
Most Philips 4K TVs can adjust the brightness according to the ambient light in the room. AV purists criticised the feature in the past for its poor implementation. However, Philips’ all-new Ambient Intelligence system significantly improves this feature’s effectiveness. It adjusts the brightness in tandem with the Dolby Vision metadata of the content, resulting in a much more refined viewing experience.
If your Philips 4K TV supports it, we recommend using the Ambient Intelligence feature. Even if your TV only supports standard Dolby Vision, you’ll usually have separate presets available for light and dark rooms.
To achieve ambient lighting that doesn’t cause distraction, placing light strips behind your Philips 4K TV is a good option. It’s commonly referred to as “bias lighting”. Newer Philips TVs often feature Ambilight LED technology that fires backlight from the rear, which looks attractive and provides a comfortable viewing experience.
Optimal Viewing Angle and Distance
- 40-42” 4K: Minimum 1.3 metres
- 46” 4K: Minimum 1.5 metres
- 50-52” 4K: Minimum 1.7 metres
- 65” 4K: Minimum 2.1 metres
Position your Philips 4K TV at eye level while seated for optimal viewing. You can achieve this by investing in a suitable TV stand with room for additional AV equipment, such as a set-top box, Blu-ray player, games console, or soundbar.
If you choose to wall-mount your Philips TV, the same rule applies. Avoid mounting it above a fireplace, as it can be uncomfortable and similar to sitting in the front row of the theatres. However, if you have to position the TV higher than eye level, angle it downwards to reduce discomfort during viewing.
The distance you should sit from your TV varies depending on the screen resolution and size. As the screen size increases, the pixel size also increases. Sitting too close can make individual pixels and screen artefacts more noticeable. A general rule of thumb for 4K TVs is to sit between 1 and 1.5 times the screen’s diagonal size.
The increased resolution of 4K screens results in smaller pixels, allowing viewers to sit much closer to the screen than Full HD TVs. You can sit almost two-thirds closer to a 4K screen without being able to discern individual pixels. Nevertheless, the ideal viewing distance depends on your preference and room layout.
Read also: What is the best picture setting for LG 4K TV?
Explaining Philips 4K TV Picture Presets
Philips 4K TV “Picture styles” are factory profiles optimised for different content types and viewing environments. These include Personal, Vivid, Natural, Eco, Movie, Filmmaker Mode, Game, Monitor, Expert 1, Expert 2, and Calman.
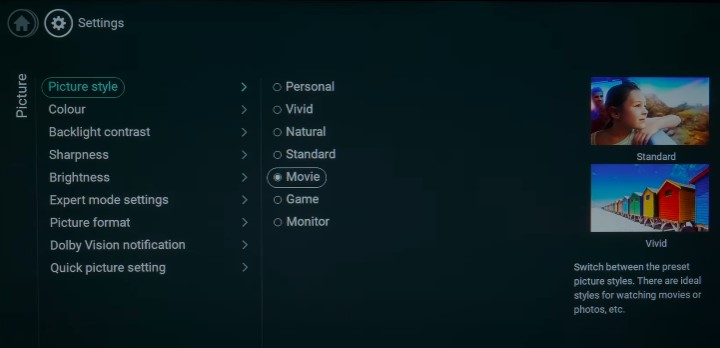
- Personal: Allows you to customise and save your own preferred picture settings.
- Vivid: Provides a high-contrast and bright picture, best suited for brightly lit rooms.
- Natural: Offers a balanced picture with more realistic colours, suitable for general viewing in average lighting conditions.
- Eco: Aims to be environmentally friendly. However, we recommend turning this feature off as it can affect the brightness and performance of your TV.
- Movie: Optimises the picture for movie content, providing deeper blacks, more accurate colours, and a cinematic experience.
- Filmmaker Mode: Disables post-processing effects, such as motion smoothing, with a warmer and natural colour profile to display films as intended by the filmmakers, without any modifications.
- Game: Optimises the picture for gaming, reducing input lag (auto-switches ALLM) and improving the clarity of fast-moving objects.
- Monitor: Designed for use as a computer monitor, with enhanced sharpness and clarity for text and other graphics.
- Expert 1: Provides advanced picture settings for purists who want to fine-tune the image to their tastes.
- Expert 2: Another advanced picture preset for further customisation.
- Calman: Meant for professional calibration, achieving the best possible accuracy for colour and brightness.
The Best Picture Settings For Philips 4K TV

Using your Philips 4K TV’s preset picture styles is a fast and easy way to improve your experience quickly, but you can also adjust and fine-tune each mode to your liking in the Picture Settings menu.
| Disclaimer: It’s advisable to record the original values of the various picture settings and the modified values after making changes for future reference. |
Backlight | Brightness | Contrast
Philips 4K TVs typically offer several options for adjusting the screen brightness or luminance.
Firstly, there’s the Contrast or Video contrast setting (under the Advanced Contrast Settings menu), which controls the difference between the brightest and darkest parts of the image. It helps make the image appear more dynamic and vivid.
The ideal contrast setting depends on personal preference, the room lighting conditions, and the content. Adjust the contrast setting while viewing content with a mix of bright and dark scenes to find the optimal balance.
Then comes the Backlight setting, which controls the brightness of the backlight behind the screen. Increasing the backlight brightness can make the image appear brighter but may also reduce contrast and make black scenes look greyish.
Finally, the Brightness setting lets you control the overall image brightness. You must tweak it relative to the above two options to achieve the desired brightness and contrast levels. It’s important not to set the brightness too high, as it causes eye strain and potentially reduces your TV’s lifespan.
Incorrect settings can result in issues such as Black Crush and Clipping. Black Crush occurs when dark areas of an image appear as solid black without any details. It can happen when you set the brightness value too low, resulting in lost shadow details.
On the other hand, Clipping occurs when you set the contrast value too high, causing bright areas of the image to lose detail and appear as a solid white.
Check out: How do I get the best picture on my Samsung 4K TV?
Contrast (Advanced)
Under the “Advanced” submenu of your Philips 4K TV’s Picture Settings, you’ll find the following contrast-related options:
- Contrast mode: You can choose how the TV auto-adjusts the contrast: for less power consumption or the best picture experience. We recommend setting it to “Off” or “Optimised for picture”.
- HDR Upscaling: Enabling it may improve brightness and contrast impression when playing HDR content from compatible sources. Keep this Off.
- Dynamic contrast: Allows you to set the level at which the TV auto-enhances the light and dark areas of the picture. It’s best to keep it Off.
- Video contrast: Lets you adjust the general contrast value, which determines the difference between bright and dark areas of the picture. The higher the setting, the more prominent the difference.
- Light sensor: Enabling it uses the ambient light sensor to auto-adjust the panel brightness as per room lighting conditions. We suggest keeping it Off.
- Gamma: Adjusts the TV’s mid-contrast range to match the grayscale range of the source signal. The recommended setting for Philips 4K TVs is around 2 (-1 for OLED models).
Sharpness
The Sharpness setting on Philips 4K TVs adjusts the edge definition of the picture. It makes the image appear crisper and more detailed by enhancing the contrast between the edges and surrounding areas.
However, set the Sharpness too high, and you get unwanted artefacts and noise in the image, reducing the overall picture quality. The recommended setting for Sharpness on Philips 4K TVs is usually around 20 to 25.
Ultra resolution
The Ultra resolution option under the Advanced Sharpness Settings menu is similar to Sony BRAVIA’s Reality Creation feature. Enabling it offers superior sharpness, particularly on aliased lines and contours in the image. However, we suggest keeping it Off as it usually tends to cause oversharpening.
Related Settings
- Noise reduction: Filters out and reduces the image noise. It can cause ugly artefacts on standard-definition content.
- MPEG artefact reduction: This applies a filter to eliminate artefacts in MPEG-encoded content, similar to noise reduction.
Colour
The Colour setting allows you to adjust the level of colour from black and white to the highest colour saturation. You can use it to achieve more accurate and natural colours or to enhance the vibrancy (saturation) for a more dynamic and vivid image.
We recommend leaving it to the default value. You can go to the Advanced submenu for more colour-related settings, including:
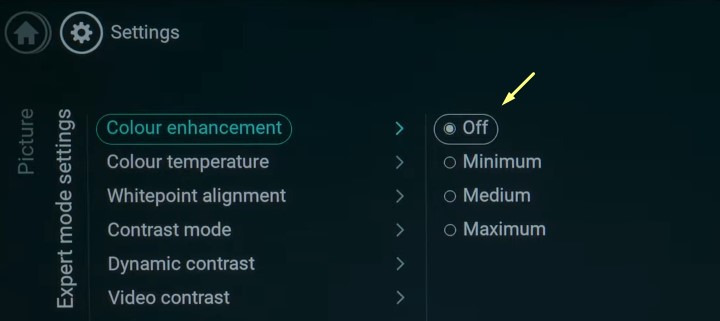
- Colour enhancement: Set the level of auto-enhancement for colour details and intensity in brighter scenes. Keep it Off to avoid oversaturation.
- Colour gamut: Set it to “Wide” to boost the gamut for SDR content and enhance colour vibrancy. Note it doesn’t compromise the overall picture accuracy.
- Colour temperature: Adjusts the overall colour balance of the picture, making it appear warmer or cooler depending on the selected temperature value. The best option comes down to your viewing preference.
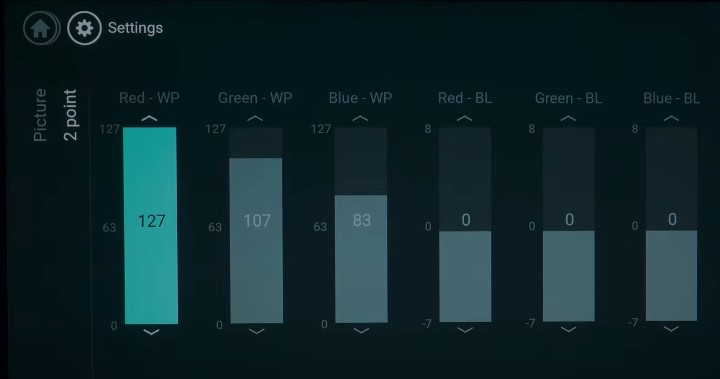
- Whitepoint alignment: Lets you adjust the colour temperature to match the standard white point temperature of 6500K. It helps provide a more accurate and natural colour representation on the screen. It’s for professional calibration only.
- Colour control: Allows you to adjust the saturation level by increasing or decreasing the intensity of colours separately. It’s for professional calibration only.
Motion
The Motion setting on your Philips 4K TV adjusts motion handling for smoother movements in fast-paced scenes. The TV inserts interlaced images into the displayed content, and the level of smoothing varies based on the selected setting, including Off, Movie, Pure cinema, Standard, Smooth, and Personal.
We strongly suggest setting it to Off. Usually, the motion processing option on TVs is a controversial feature as it can result in a smoother-moving object but an overall less stable image. It can lead to distracting blurry halos around objects and the ‘Soap Opera Effect‘ in movies shot at 24fps. For sports programming, some prefer the smoother image despite the picture artefacts it introduces.
There are also Fast Motion Clarity and Perfect Motion settings on select Philips 4K TVs, giving users individual blue and judder controls. We recommend disabling them.
| Typically, the image adjustments apply only to the chosen HDMI input. Though Philips provides an option to set the settings across all sources, adjusting the picture quality for individual inputs could be beneficial to fine-tune the image for specific sources.
You may also need to make separate adjustments for HDR and non-HDR signals, and some people even prefer different settings for day and night-time conditions. |
How to Reset Philips 4K TV Picture Settings
To revert to the default factory values for your Philips 4K TV’s picture settings, follow these steps:
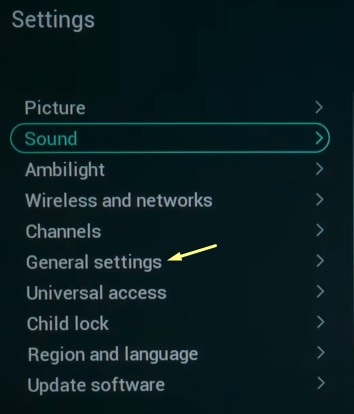
- Navigate to your Philips TV’s Settings menu by pressing the corresponding remote button or from your TV’s built-in interface.
- Scroll down to General settings on the left-hand sidebar.
- Find the Reset picture mode option and select it.
- Press OK to confirm the reset.
Best Philips 4K TV Picture Settings For Gaming
For an optimised gaming experience, switch to the Game picture preset on your TV, as it reduces input lag to a minimum. Your Philips 4K TV typically detects the input signal from a compatible game console and auto-switches to the preset.
However, if you want to make further adjustments, you can use the following instructions to fine-tune the settings according to your preference. Overall, the default preset configuration provides decent picture quality.
Some Philips 4K TV models don’t support using VRR (Variable Refresh Rate) and Dolby Vision simultaneously. You must choose between either variable refresh rate or enhanced picture quality, as enabling the increased dynamic range function lowers the refresh rate from 120 to half the value at 60 Hz.
Navigate to Settings by pressing the cog icon on your remote, then select All settings followed by General settings. Under the “HDMI Ultra HD” option, you can view the individual HDMI ports. Choose the HDMI 2.1 port to which your PlayStation or Xbox console is connected, but avoid using the side ports as they usually don’t support 4K@120Hz.
You’ll have two options: “Optimal”, which has the best picture settings but higher input lag, or “Dynamic (automatic gaming mode)”, which offers VRR and low input lag.
Conclusion
This extensive guide highlights the best picture settings for Philips 4K TVs. It’s important to note that while these instructions generally apply to most Philips LED and OLED TVs, the menu layout, labels, and access to specific picture options may differ depending on the model and year of production.
If you’re unsatisfied with the final viewing experience or have difficulty comprehending the instructions, it may be worthwhile to appoint an expert to calibrate your Philips 4K TV’s picture settings using specialised calibration equipment.