The Meta Quest 2, previously known as the Oculus Quest 2, is the reigning VR headset in the consumer market and represents a notable milestone in the VR industry, with many significant improvements over the original model.
Despite its immense success, some users are left with a sour taste in their mouths due to poor clarity or blurry visuals. Various factors contribute to this issue – some of which have proper remedies (e.g., adjusting the IPD), while the rest are inherent limitations of the headset.
If you have the same complaint, you’re not alone. The good news is there are ways to resolve the clarity issues and get the best possible experience from your Quest 2. This in-depth guide explores some of them, with tips to fix Quest 2’s blurriness.
Meta (Oculus) Quest 2 Blurry: How To Fix?
Calibrate the IPD (Inter-Pupillary Distance)
The IPD is the distance between your pupils. Setting it to the correct value can vastly reduce blurriness and, in turn, prevent dizziness, headaches, and nausea. The Quest 2 allows users to adjust the IPD, so you can easily set it to match your desired measurements.
Measuring Your IPD
Measuring your Inter-Pupillary Distance requires two simple tools: any ordinary ruler with millimetre (mm) markings and a mirror. Here’s how to measure your IPD:
- Stand in front of a mirror and close your left eye.
- Open your right eye and look directly at your right eye reflection in the mirror.
- Hold the ruler below your right eye, aligning the zero marker to the centre of your right pupil.
- Close your right eye and open your left eye, ensuring you don’t move the ruler.
- Focus your left eye on the left eye reflection in the mirror.
- Look straight ahead and jot down the millimetre distance that aligns with the centre of your left pupil.
The norm for IPD typically falls around 63mm. However, it can vary from individual to individual and range from 55mm to 72mm or even exceed that range.
Adjusting the IPD on Quest 2 Headset
Having determined your IPD, it’s time to adjust it on your Quest 2. You can do so by moving the lenses closer or farther apart.
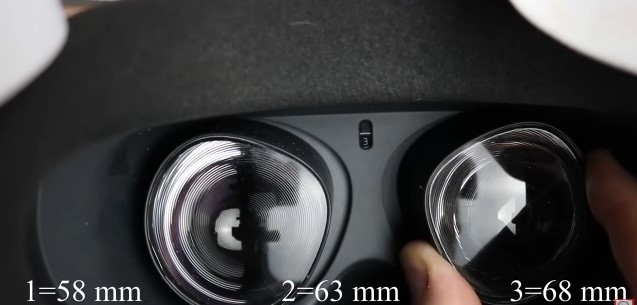
The headset has three IPD adjustment presets, 58mm (Preset 1), 63mm (Preset 2), and 68mm (Preset 3). The middle one is the out-of-the-box preset, covering the average IPD. Preset 1 has the lenses closest to each other, while Preset 3 has them furthest apart. Utilise your IPD measurement to determine the best preset for you.
To make adjustments, grasp the protruded grey plastic piece on the exterior of one lens of your Quest 2 headset, then move the lens gently towards the other to decrease the IPD or away from each other to increase it.
If your Inter-Pupillary Distance falls outside of the standard presets, don’t worry. Meta has engineered the Quest 2’s lenses to accommodate a variety of measurements, so one of the presets should be suitable for most individuals.
Assuming your IPD falls in an awkward space between the presets, you’d be glad to know that you can delicately adjust the lenses on the Quest 2 headset to achieve a more specific IPD setting between the presets.
Simply push the lenses beyond Preset 1 or 2 to achieve a more precise IPD measurement. If you find it difficult to go past the presets, try adjusting the lenses from a higher preset towards a lower one instead.
How to Measure Your IPD (Video Tutorial)
Wear Your Headset Properly
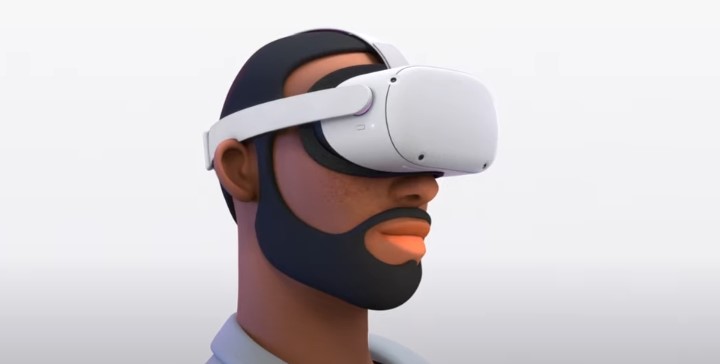
Properly wearing your Meta Quest 2 headset is crucial for avoiding blurry visuals. Wear it too high or low or slightly misaligned, and you’ll experience a noticeable decline in image clarity.
The Quest 2’s included head strap is vastly different from what the original Quest used. Hence, if you owned the previous model, you must adapt to the new design for the Quest 2. Begin with adjusting the side straps and ensure they sit comfortably around your head.
To adjust the head strap circumference, grasp the straps from the back and take hold of the sliding clips. Move the plastic adjusters closer together to decrease the head strap size, and move them further apart to increase the size.
To achieve a comfortable fit, we recommend securing the headset’s display section onto your face before settling the straps onto the back of your head. The straps should provide a firm hold on the headset yet not be too constrictive. Ensure the straps form a straight line across the back of your head, encompassing the area above your ears.
To properly adjust the top strap, wear the Quest 2 and secure the side straps. Next, access the velcro strap on the top, then tighten it towards the back of your head, bringing it up to the level of the side straps. To loosen, grasp the velcro strap with one hand while using the other to lower the side strap.
If you have the Elite Strap for your Quest 2, use the tightening knob to secure the headset further. It’ll keep the headset firmly in place and provide a more stable fit.
Also Read: Connect Bluetooth Headphones With Oculus Quest 2
Achieving the Best Fit with Glasses
Contrary to popular belief, wearing glasses with VR headsets isn’t harmful or detrimental to your experience – as long as the frame of your glasses allows you to wear the headset comfortably and correctly.
Provided you wear prescribed glasses while using the Quest 2, utilise the included glasses spacer to leave enough gap to fit your eyewear without damaging the lenses.
- Install the glasses spacer to the Meta Quest 2. You’ll know it’s in place when you hear a click on both the top and bottom.
- Secure the face cover onto the glasses spacer, ensuring it forms a barrier between your face and the headset.
Clean the Lenses
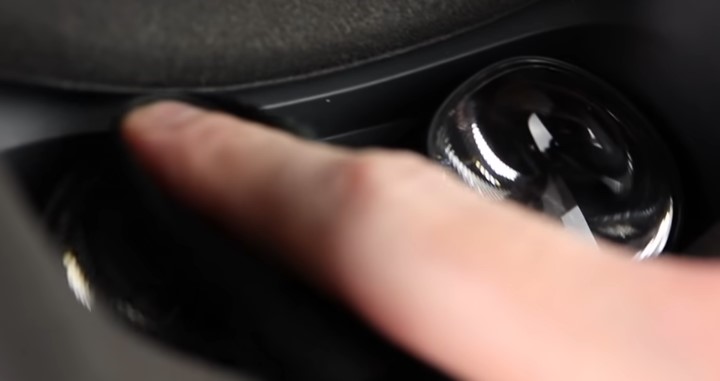
It’s crucial to keep the lenses of the Quest 2 clean, especially after a session of intense gaming. It resolves the blurriness from all the fingerprints and smudges you put on touching the lenses, plus the dust build-up near them.
According to the Meta Quest Help Centre, the recommended method for cleaning the lenses is to use a dry microfiber cloth designed for optical lenses and wipe it in a circular motion starting from the centre and working your way outwards.
Using non-abrasive anti-bacterial wipes is also acceptable. However, don’t use abrasive cloths or wipes, as they can scratch the lenses and impair their clarity. Avoid exposing the lenses to alcohol or cleaning solution, as this can lead to problems.
Check for Damage
If you’re noticing an unexpected decrease in image clarity, it could be due to physical damage to your Quest 2 headset. Common causes include scratches on the lenses that impair the visual quality and accidental drops, disrupting the alignment of the lenses or display and leading to a blurry mess.
Unfortunately, there’s no DIY solution to fix it. The only action is to send it to an official servicing centre belonging to Meta, the headset manufacturer, for repair or replacement.
Change Graphics Preferences (For Quest Link)
If you’re experiencing blurry visuals with your Quest 2 when using it as a PCVR headset over Quest Link (wired connection), adjusting the graphical settings could help improve the motion clarity, particularly the refresh rate. Here’s how:
- First, launch the Oculus app on your PC and make sure your headset is connected.
- Next, select “Devices” in the sidebar and click on your Quest 2 and Touch device to access the further options.
- In the following menu that appears, scroll down and click Graphics Preferences under the “Advanced” section.
- Choose 120 Hz under Refresh Rate and click OK to save the changes.
You may further alleviate the visual blurriness (that usually comes from the stream compression Quest Link uses) by increasing the Rendering Resolution to a higher value by adjusting the multiplier. However, if your PC struggles to handle VR titles at higher render resolutions, it’s advisable to stick to the default rendering resolution and refresh rate for a stable experience.
If using Air Link for tether-free PCVR, a high-speed, uninterrupted 5 GHz connection to a Wi-Fi 6 router is essential, besides making graphical changes. Assuming your current setup doesn’t meet the conditions, simply altering the settings may not provide optimal image quality.
See: Fix Oculus Quest 2 not Casting Issue
Boost Texture Resolution (For Standalone Use)
The visuals in virtual-reality games on the Meta Quest 2 can often appear hazy or soft due to the limited processing power. After all, a Snapdragon mobile chipset powers the headset, and the textures used in the standalone titles are not of high resolution.
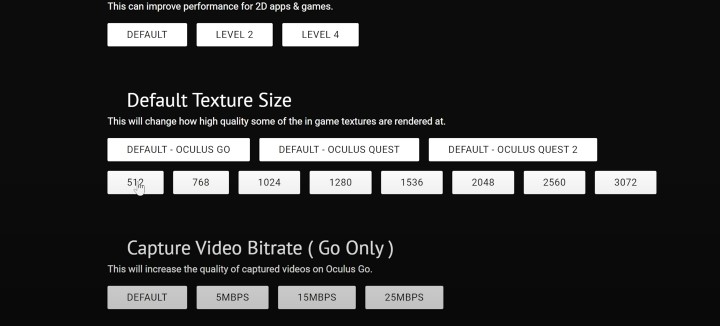
By installing SideQuest on your headset and adjusting the texture size, you can enhance the textures and improve the overall graphical presentation for reduced blurriness at the cost of slightly higher battery consumption. You must also install SideQuest on your PC or Android phone to make the changes.
The following step-by-step video tutorial by YouTuber Maraksot78 (huge thanks!) should help you set up SideQuest on PC and increase your Quest 2’s texture resolution. This official SideQuest Mobile video tutorial will come in handy for Android users.
Setting the Default Texture Size to 2048 offers a noticeable reduction in blurriness, improving the graphics quality without hampering performance. You may also try selecting 2560, though you may experience occasional frame rate dips in intensive scenes.
Feel free to play with the other options in SideQuest, particularly the FFR (Fixed Foveated Rendering) level. The higher you set it, the less strain it puts on the hardware since it allows for rendering the graphics around the display’s edges at a lower resolution while leaving the centre, where you most likely focus on most, untouched.
Learn: How to Cast Meta Quest Pro to Samsung Smart TV
To Wrap Up
Anyways, that’s all we can offer in terms of fixing the Quest 2 blurry image, at least to an extent. That said, some of the “blurriness” comes from the hardware itself, which is unfixable by the end user. It includes the following:
- The Quest 2, like many VR headsets, utilises Fresnel lenses. They’re much slimmer compared to lenses needed for conventional focusing of images. These lenses consist of a layer of circular ridges that concentrate light but may result in visual anomalies in VR, usually seen as circular bands of light, which become apparent when examining bright objects against a dark backdrop.
- Another drawback of the Quest 2 lenses is their plastic construction rather than glass. It results in lower-quality optics, with an increased risk of optical distortion and visual clarity. While plastic lenses are a cost-effective solution, they sacrifice visual quality compared to glass lenses.
- Quest 2 screens exhibit some Screen-Door Effect due to their moderate pixel density, which slightly deteriorates the clarity and sharpness of the image. Although it’s typically not very noticeable, it still impacts the overall image quality.
Ultimately, the Quest 2 is a standalone all-in-one VR headset. The visual fidelity it’s capable of isn’t close to matching PCVR headsets, such as the HP Reverb G2, HTC Vive Pro 2, or Valve Index, even when you connect it to a beefy computer for playing PCVR games either through USB or Wi-Fi.
However, the popularity of the Meta Quest 2 headset isn’t solely attributed to its ability to match the performance of PCVR headsets. Instead, the exceptional VR experience it provides as a standalone device with the option of PCVR, all at an affordable price point, makes it such a compelling option.
And with the scale at which virtual-reality technology is making progress, it’s reassuring that headsets will soon deliver VR experiences free of the visual disruptions currently seen with the Quest 2 at a level of clarity and definition that will be accessible to all.